Runtime System - Your Game’s Heartbeat
The Runtime System is your game’s conductor, orchestrating all the moving pieces to create a cohesive experience. While the engine provides powerful systems for graphics, physics, and audio, the Runtime System is what ties them all together and keeps everything running in harmony.
Think of it like running a theater production: you have lighting technicians, sound engineers, actors, and stagehands. Each group does their job, but someone needs to coordinate them. Calling cues, managing scene changes, and ensuring everything happens in the right order. That’s the Runtime System.
How It All Fits Together
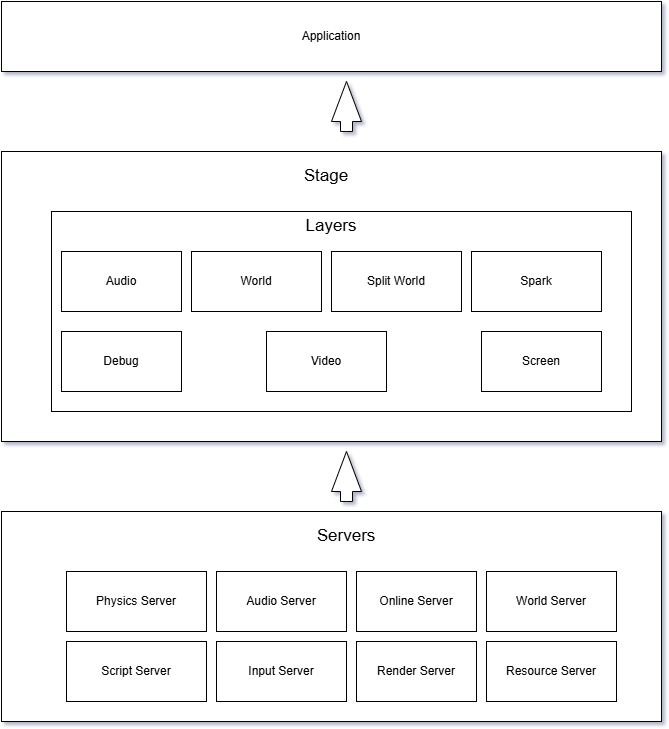
The Runtime System uses a server-based architecture. Instead of having one monolithic game loop that handles everything, different subsystems are implemented as “servers”. Independent managers that each handle one domain. The RenderServer handles graphics, the PhysicsServer manages physics simulation, the AudioServer controls sound, and so on.
The runtime uses the State design pattern at multiple levels:
States (IState) are the low-level runtime abstraction. They implement the core update cycle (enter(), update(), postUpdate(), build(), render(), leave()). States are used in custom applications and runtime plugins when you need complete control.
Stages are the high-level, data-driven layer built on top of states. A Stage is managed by StageState - a special IState implementation that wraps and delegates to a Stage. Stages are what you create and edit in the Traktor editor. Each stage contains an ordered list of Layers.
Layers are modular components within a stage. Think of layers like transparencies stacked on an overhead projector: the background layer (WorldLayer), the UI layer (SparkLayer), the audio layer (AudioLayer), each updated and rendered in order. Layers are the building blocks you compose to create your game’s screens and levels.
For most game development, use Stages and Layers - they’re data-driven, editable in the editor, and easy to iterate on. Only use States directly when building custom runtime plugins or applications that need low-level control.
Application Architecture
IApplication Interface
The IApplication interface is the foundation of any Traktor application:
class IApplication : public Object
{
    virtual IEnvironment* getEnvironment() = 0;
    virtual IStateManager* getStateManager() = 0;
};
Responsibilities:
- Provide access to the runtime environment (servers)
- Provide access to the state manager (for state transitions)
The application instance is created and managed by the runtime framework. Your application implementation provides access to the environment and state manager, which are used throughout the game to access servers and manage game states.
Server System
Servers are managers for major subsystems. All servers extend the base IServer interface. Each server provides access to a specific subsystem:
Available Servers
IRenderServer - Graphics rendering
class IRenderServer : public IServer
{
    virtual render::IRenderSystem* getRenderSystem() = 0;
    virtual render::IRenderView* getRenderView() = 0;
    virtual int32_t getWidth() const = 0;
    virtual int32_t getHeight() const = 0;
    virtual float getAspectRatio() const = 0;
    virtual int32_t getMultiSample() const = 0;
    virtual float getRefreshRate() const = 0;
    virtual double getCPUDuration() const = 0;
    virtual double getGPUDuration() const = 0;
    virtual int32_t getFrameRate() const = 0;
};
IPhysicsServer - Physics simulation
class IPhysicsServer : public IServer
{
    virtual physics::PhysicsManager* getPhysicsManager() = 0;
};
IAudioServer - Audio playback
class IAudioServer : public IServer
{
    virtual sound::AudioSystem* getAudioSystem() = 0;
    virtual sound::SoundPlayer* getSoundPlayer() = 0;
    virtual sound::SurroundEnvironment* getSurroundEnvironment() = 0;
};
IScriptServer - Script execution
class IScriptServer : public IServer
{
    virtual script::IScriptManager* getScriptManager() = 0;
    virtual script::IScriptContext* getScriptContext() = 0;
};
IWorldServer - Entity/World management
class IWorldServer : public IServer
{
    virtual void addEntityFactory(world::IEntityFactory* entityFactory) = 0;
    virtual void removeEntityFactory(world::IEntityFactory* entityFactory) = 0;
    virtual void addEntityRenderer(world::IEntityRenderer* entityRenderer) = 0;
    virtual void removeEntityRenderer(world::IEntityRenderer* entityRenderer) = 0;
    virtual world::IEntityFactory* getEntityFactory() = 0;
    virtual world::WorldEntityRenderers* getEntityRenderers() = 0;
    virtual Ref<world::IWorldRenderer> createWorldRenderer(const world::WorldRenderSettings* settings) = 0;
};
IResourceServer - Asset loading
class IResourceServer : public IServer
{
    virtual resource::IResourceManager* getResourceManager() = 0;
};
IInputServer - Input handling
class IInputServer : public IServer
{
    virtual bool createInputMapping(const input::InputMappingStateData* stateData) = 0;
    virtual bool fabricateInputSource(const std::wstring& sourceId, input::InputCategory category, bool analogue) = 0;
    virtual bool isFabricating() const = 0;
    virtual bool abortedFabricating() const = 0;
    virtual bool resetInputSource(const std::wstring& sourceId) = 0;
    virtual bool isIdle() const = 0;
    virtual void apply() = 0;
    virtual void revert() = 0;
    virtual input::InputSystem* getInputSystem() = 0;
    virtual input::InputMapping* getInputMapping() = 0;
    virtual input::RumbleEffectPlayer* getRumbleEffectPlayer() = 0;
};
IOnlineServer - Online services
class IOnlineServer : public IServer
{
    virtual online::ISessionManager* getSessionManager() = 0;
};
Environment
The IEnvironment interface provides access to all servers:
Ref<IRenderServer> renderServer = environment->getRenderServer();
Ref<IPhysicsServer> physicsServer = environment->getPhysicsServer();
Ref<IScriptServer> scriptServer = environment->getScriptServer();
// ... etc
State System
States represent different modes or screens of your application.
IState Interface
class IState : public Object
{
    T_RTTI_CLASS;
public:
    enum UpdateResult
    {
        UrFailed = -1,  // Update failed, enter error recovery
        UrOk = 0,       // Update succeeded
        UrExit = 2      // Update succeeded but wants to terminate
    };

    enum BuildResult
    {
        BrFailed = -1,   // Build failed
        BrOk = 0,        // Build succeeded
        BrNothing = 1    // Nothing built, use default renderer
    };

    // Called when entering this state
    virtual void enter() = 0;

    // Called when leaving this state
    virtual void leave() = 0;

    // Update game logic
    virtual UpdateResult update(
        IStateManager* stateManager,
        const UpdateInfo& info
    ) = 0;

    // Post-physics update
    virtual UpdateResult postUpdate(
        IStateManager* stateManager,
        const UpdateInfo& info
    ) = 0;

    // Build rendering commands
    virtual BuildResult build(
        uint32_t frame,
        const UpdateInfo& info
    ) = 0;

    // Render the frame
    virtual bool render(
        uint32_t frame,
        const UpdateInfo& info
    ) = 0;

    // Handle events
    virtual bool take(const Object* event) = 0;
};
State Lifecycle
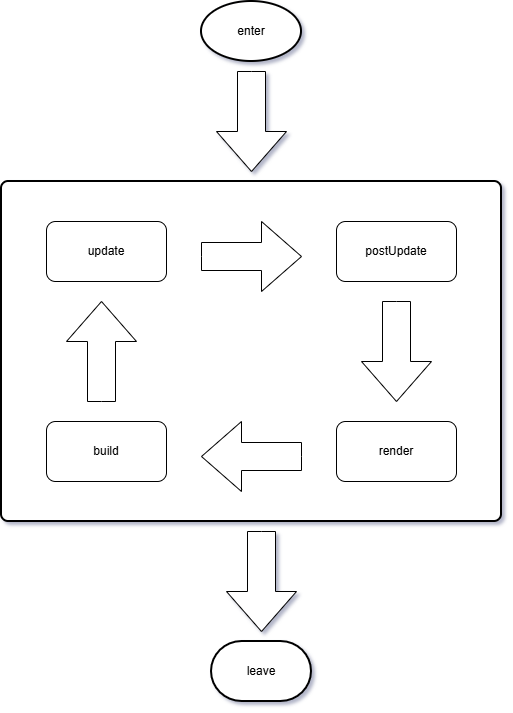
- enter() - Initialize state resources
- update() - Update game logic (pre-physics)
- postUpdate() - Update after physics
- build() - Build rendering commands
- render() - Submit rendering
- leave() - Clean up state resources
State Transitions
Use the IStateManager to change states:
UpdateResult MyState::update(IStateManager* stateManager, const UpdateInfo& info)
{
    if (shouldLoadLevel)
    {
        // Transition to new state
        stateManager->enter(new LevelState(...));
    }
    return UrOk;
}
State Manager Interface:
class IStateManager : public Object
{
    virtual void enter(IState* state) = 0;
};
The enter() method transitions to a new state. The state manager handles calling leave() on the current state and enter() on the new state.
Stage System
Stages provide a higher-level, data-driven approach to organizing application content. They were designed to manage different states a game can be in - like frontend menus, loading screens, and in-game gameplay - and handle transitions between these states in a controlled manner.
Important: Stages are not States themselves. A Stage is managed by StageState, which is a concrete implementation of IState. When you use stateManager->enter(new StageState(environment, stage)), you’re creating a state that wraps and manages your stage. The StageState delegates the IState lifecycle methods to the Stage, which in turn manages its layers.
What is a Stage?
A Stage represents a high-level state your application can be in:
- Frontend/Main Menu - Title screen, options, level select
- Loading Screen - Asset loading between levels
- In-Game - Active gameplay
- Pause Menu - Game paused state
- Cutscene - Story sequences
Each stage contains an ordered list of Layers that work together to create that state.
Layers
Layers are the building blocks stacked on top of each other within a stage. Each layer type handles a specific aspect of your game. All layers extend the base Layer class in Runtime/Engine.
The Layer base class defines lifecycle methods that are called by the Stage:
class Layer : public Object
{
public:
    virtual void destroy() = 0;
    virtual void transition(Layer* fromLayer) = 0;    // Called during stage transitions
    virtual void preUpdate(const UpdateInfo& info) = 0;
    virtual void update(const UpdateInfo& info) = 0;
    virtual void postUpdate(const UpdateInfo& info) = 0;
    virtual void preSetup(const UpdateInfo& info) = 0;
    virtual void setup(const UpdateInfo& info, render::RenderGraph& renderGraph) = 0;
    virtual void preReconfigured() = 0;
    virtual void postReconfigured() = 0;
    virtual void suspend() = 0;
    virtual void resume() = 0;
    virtual void hotReload() = 0;

    Stage* getStage() const;
    const std::wstring& getName() const;
    bool isTransitionPermitted() const;
};
Layers are updated in the order they’re added to the stage. The Stage calls each layer’s lifecycle methods during its own update cycle.
Available Layer Types:
WorldLayer - Handles 3D environments:
- Loads and manages scenes
- Updates entities and components
- Handles world rendering with a camera
SplitWorldLayer - Handles split-screen 3D environments:
- Same as WorldLayer but with multiple viewports
- Supports local multiplayer (2-player split screen)
- Each viewport can have its own camera
AudioLayer - Handles audio:
- Background music
- Ambient sounds
- Sound effect parameters and tweening
SparkLayer (from Spark module) - Handles UI:
- Menus and HUD
- In-game UI elements
- Vector graphics rendering
VideoLayer - Handles fullscreen video:
- Cutscenes
- Video playback
- Pre-rendered sequences
- Controllable screen bounds
ScreenLayer - Handles custom fullscreen shader effects:
- Post-processing effects
- Fullscreen shader rendering
- Custom shader parameter callbacks
DebugLayer - Handles debug visualization:
- Draw debug points, lines, and frames
- Visualize physics, AI, or custom debug info
- Development-time helper (added in 2024)
Layers are updated and rendered in the order they’re defined, allowing you to control execution and rendering sequence.
Example Stage Structure
Stage: "MainMenu"
├── WorldLayer: "Background"
│   └── Scene: Animated 3D menu background
├── AudioLayer: "Music"
│   └── Ambient menu music
└── SparkLayer: "UI"
    └── Menu buttons and text

Stage: "Gameplay"
├── WorldLayer: "World"
│   └── Scene: Level geometry, player, enemies
├── AudioLayer: "Audio"
│   └── Game sounds and music
├── SparkLayer: "HUD"
│   └── Health bar, score, minimap
└── VideoLayer: "Cutscenes"
    └── Optional cutscene playback
Creating Stages
In the Editor (Recommended):
Stages are created as StageData assets in the editor:
- In the Database, create a new Stage asset (creates a StageData)
- Add Layers to the stage (LayerData instances)
- Configure layer properties (scenes, resources, etc.)
- Define transitions to other stages (named transitions map to stage GUIDs)
- Optionally attach a script class for stage-level logic
The editor creates StageData which is serialized. At runtime, StageData::createInstance() creates the actual Stage with all its layers.
Programmatically (Advanced):
// Create a stage manually (rarely needed - usually loaded from editor)
Ref<Stage> stage = new Stage(
    name,              // Stage name
    environment,       // Runtime environment
    classProxy,        // Optional script class
    shaderFade,        // Optional fade shader
    fadeOutUpdate,     // Continue updating during fade out
    fadeRate,          // Fade transition rate
    transitions,       // Map of transition names to stage GUIDs
    params             // Optional parameters
);

// Add layers
stage->addLayer(new WorldLayer(...));
stage->addLayer(new AudioLayer(...));

// Wrap in StageState and enter
stateManager->enter(new StageState(environment, stage));
Stage Transitions
One of the key benefits of stages is controlled transitions between game states. Stages have a built-in transition system based on named transitions defined in the editor.
How Transitions Work:
- Each stage defines named transitions (e.g., “NextLevel”, “MainMenu”, “GameOver”)
- Each transition name maps to a Stage GUID (configured in editor)
- When you trigger a transition, the Stage loads the target stage and handles the state manager transition automatically
Benefits:
- Old stage’s resources are fully unloaded before loading the new stage
- Memory management on constrained platforms
- Built-in fade effects during transitions
- Layer transition support (layers with matching names/types can persist state)
- Clean separation of game states
// In C++ - Synchronous loading
Ref<Stage> nextStage = currentStage->loadStage(L"NextLevel", params);
currentStage->gotoStage(nextStage);  // Creates new StageState and calls stateManager->enter()

// In C++ - Asynchronous loading (better for large stages)
Ref<StageLoader> loader = currentStage->loadStageAsync(L"NextLevel", params);
// ... in update loop ...
if (loader->isReady())
{
    Ref<Stage> nextStage = loader->getStage();
    currentStage->gotoStage(nextStage);
}

// Stage API (from Stage.h)
bool haveTransition(const std::wstring& name) const;  // Check if transition exists
Ref<Stage> loadStage(const std::wstring& name, const Object* params);
Ref<StageLoader> loadStageAsync(const std::wstring& name, const Object* params);
bool gotoStage(Stage* stage);  // Trigger transition
-- In Lua (scripting) - typically called from stage scripts
stage:loadStage("NextLevel", params)  -- Loads and transitions automatically
Layer Transitions:
When transitioning between stages, layers with matching names and types can transfer state:
// Layer::transition() is called for layers that match by name and type
virtual void transition(Layer* fromLayer);
This allows you to preserve state across stage transitions (e.g., keeping the same world layer when moving between areas).
Design Philosophy and Flexibility
The stage system was developed for Traktor’s second game after the developers realized it would have been invaluable in their first game (Puzzle Dimension), which lacked this feature.
Important: While stages provide a powerful organizational structure, they’re optional and flexible:
- You can use a single stage for your entire game and handle all loading/unloading from gameplay code or scripts
- You can use stages minimally (just main menu and in-game)
- You can use stages extensively (separate stage for each level, cutscene, menu screen)
There’s no friction in deciding layers upfront - if you find the structure constraining, you can always just use one stage and manage everything manually through code. The system adapts to your needs.
Stage vs State
| Aspect | State (IState) | Stage (managed by StageState) |
|---|---|---|
| Abstraction Level | Low-level runtime interface | High-level data-driven container |
| Defined in | C++ code (custom implementation) | Editor (StageData asset) |
| Best for | Custom runtime plugins, low-level control | Game levels, menus, gameplay screens |
| Lifecycle | Implements enter(), update(), postUpdate(), build(), render(), leave() | Managed by StageState which delegates to Stage and Layers |
| Layers | Manual management | Built-in ordered layer system |
| Editor Support | None - code only | Full editor support for creation and configuration |
| Transitions | Manual state manager calls | Built-in transition system with fade effects |
| Use Case | Runtime plugins, custom applications | Normal game development |
The Relationship:
- Stage is NOT a State - it’s managed BY a State (StageState)
- StageState implements IState and wraps a Stage
- When you load a Stage, you create
new StageState(environment, stage)and pass it to the state manager - The StageState delegates lifecycle methods to the Stage, which manages its Layers
Recommendation: Use Stages and Layers for all normal game development. Only implement custom States when building runtime plugins or applications that need low-level control not achievable through stages.
StageState: The Bridge Between States and Stages
StageState is the concrete IState implementation that bridges the low-level State system with the high-level Stage system:
class StageState : public IState
{
public:
    explicit StageState(IEnvironment* environment, Stage* stage);

    virtual void enter() override final;
    virtual void leave() override final;
    virtual UpdateResult update(IStateManager* stateManager, const UpdateInfo& info) override final;
    virtual UpdateResult postUpdate(IStateManager* stateManager, const UpdateInfo& info) override final;
    virtual BuildResult build(uint32_t frame, const UpdateInfo& info) override final;
    virtual bool render(uint32_t frame, const UpdateInfo& info) override final;
    virtual bool take(const Object* event) override final;
};
How StageState Works:
- You create a Stage (either from a StageData asset or programmatically)
- You wrap it in a StageState:
new StageState(environment, stage) - You pass the StageState to the state manager:
stateManager->enter(stageState) - StageState’s lifecycle methods delegate to the Stage’s methods
- The Stage’s methods iterate through all Layers and call their lifecycle methods
Loading Stages:
In most cases, you don’t manually create StageState. Instead, you use Stage’s built-in transition system:
// From within a Stage (e.g., in a script or layer)
stage->gotoStage(nextStage);  // Internally creates StageState and calls stateManager->enter()
This handles the StageState creation automatically and ensures proper cleanup and transitions.
Update Loop
The game loop follows this structure:
![TODO: Flow diagram showing: Input → Update → Physics → PostUpdate → Build Render Graph → Render → Present, with frame timing]
Update Cycle
The actual runtime update cycle (from Application::update() in Runtime/Impl/Application.cpp):
1. Render Server Update
   - Process window events
   - Handle window state changes

2. Online Session Manager Update
   - Update online services (if enabled)

3. State Transitions
   - Handle state changes if requested
   - Leave current state, enter new state

4. Audio Update
   - Update audio system
   - Process sound playback

5. Input Rumble Update
   - Update controller rumble effects

6. Main Update Loop (Fixed or Variable Timestep)

   If Physics Enabled (Fixed Timestep):
   - Calculate number of simulation steps needed
   - For each simulation step:
     a. Input Update - Poll input devices, generate events
     b. State Update - currentState->update() (pre-physics)
     c. Physics Update - Step physics simulation
     d. State Post-Update - currentState->postUpdate() (post-physics)

   If Physics Disabled (Variable Timestep):
   - Input Update - Poll input devices
   - State Update - currentState->update()
   - State Post-Update - currentState->postUpdate()

7. Build Render Commands
   - currentState->build() - Culling, sorting, command generation

8. Script Garbage Collection
   - Cleanup unused script objects (incremental GC)

9. Render
   - beginFrame() - Prepare GPU for rendering
   - currentState->render() - Execute rendering commands
   - endFrame() - Finalize GPU commands
   - present() - Swap buffers and display

10. Remote Events
    - Process hot-reload and debug events from editor
Key Points:
- Fixed vs Variable Timestep: With physics enabled, the engine uses a fixed timestep simulation that may run multiple times per frame to stay in sync with rendering
- State Lifecycle: Each state implements
update(),postUpdate(),build(), andrender()methods called in this order - Threaded Rendering: The render step can run on a separate thread for better performance on multi-core systems
UpdateInfo
The UpdateInfo class provides timing and frame information:
class UpdateInfo : public Object
{
public:
    double getTotalTime() const;              // Total application time since start
    double getStateTime() const;              // Real time in current state
    double getSimulationTime() const;         // Simulation time (fixed timestep)
    double getSimulationDeltaTime() const;    // Fixed simulation delta time
    double getSimulationFrequency() const;    // Simulation frequency in Hz
    double getFrameDeltaTime() const;         // Variable frame delta time
    uint64_t getFrame() const;                // Frame count since start
    float getInterval() const;                // Interpolation interval fraction
};
Key Timing Values:
- totalTime - Total elapsed time since application start
- stateTime - Time since current state was entered (real time)
- simulationTime - Simulation time using fixed timestep (can differ from stateTime)
- simulationDeltaTime - Fixed delta time for physics simulation (typically 1/60 or 1/120)
- frameDeltaTime - Variable delta time for current frame (actual elapsed time)
- interval - Interpolation factor between simulation steps (for smooth rendering)
Frame Rate Control
class UpdateControl
{
    void setMaxFrameRate(float fps);
    float getFrameRate() const;
    float getDeltaTime() const;
};
Runtime Configuration
Application Configuration
Applications can be configured through:
- Command Line: Pass parameters via command line
- Settings Files: Load configuration from files
- Editor: Configure via editor tools
Example Application
class MyGame : public runtime::IApplication
{
public:
    virtual IEnvironment* getEnvironment() override
    {
        return m_environment;
    }

    virtual IStateManager* getStateManager() override
    {
        return m_stateManager;
    }

    // Accessing servers through environment
    void someGameMethod()
    {
        // Get servers from environment
        IRenderServer* renderServer = m_environment->getRenderServer();
        IWorldServer* worldServer = m_environment->getWorldServer();

        // Use servers...
    }

private:
    Ref<IEnvironment> m_environment;
    Ref<IStateManager> m_stateManager;
};
Plugins
The Runtime system supports plugins to extend functionality:
class IRuntimePlugin : public Object
{
    virtual bool create(IEnvironment* environment) = 0;
    virtual void destroy(IEnvironment* environment) = 0;
    virtual Ref<IState> createInitialState(IEnvironment* environment) = 0;
};
Plugin Lifecycle:
- create() - Initialize the plugin with the runtime environment. Return
trueon success,falseon failure. Plugins can register custom components, add custom servers, and extend resource factories here. - destroy() - Clean up plugin resources when the application is shutting down.
- createInitialState() - Optionally provide the application’s initial state. Only the first plugin to return a non-null state will be used. Return
nullptrif the plugin doesn’t provide an initial state.
Plugins are automatically discovered through the RTTI system and instantiated during application startup.
Best Practices
1. Use Stages for Game Content
Prefer stages over states for levels, menus, and gameplay screens:
Good: Create stages in editor → transition between them
Avoid: Writing custom state classes for every screen
2. Organize Layers Logically
Order layers by:
- Update dependency
- Rendering order
- Logical grouping
3. Handle Transitions Gracefully
// Load next stage asynchronously
Ref<StageLoader> loader = stage->loadStageAsync(L"NextLevel", nullptr);

// Show loading screen while loading
while (!loader->isReady())
{
    // Update loading screen
}

// Transition when ready
stage->gotoStage(loader->getStage());
4. Clean State Management
void MyState::enter()
{
    // Acquire resources
}

void MyState::leave()
{
    // Release resources - always cleanup!
}
5. Use UpdateInfo Properly
void MyState::update(IStateManager* sm, const UpdateInfo& info)
{
    // Use simulation delta time for physics-based updates (fixed timestep)
    position += velocity * info.getSimulationDeltaTime();

    // Use frame delta time for rendering/animation (variable timestep)
    animationTime += info.getFrameDeltaTime();

    // Use total time for timers
    if (info.getTotalTime() > m_startTime + 5.0)
    {
        // 5 seconds elapsed since app start
    }

    // Use state time for state-specific timers
    if (info.getStateTime() > 10.0)
    {
        // 10 seconds elapsed in this state
    }
}
Common Patterns
Loading Screen
class LoadingState : public IState
{
    virtual void enter() override
    {
        // Start async load
        m_loader = m_stage->loadStageAsync(L"Level1", nullptr);
    }

    virtual UpdateResult update(IStateManager* stateManager, ...) override
    {
        if (m_loader->isReady())
        {
            stateManager->enter(m_loader->getStage());
        }
        return UrOk;
    }

    virtual BuildResult build(...) override
    {
        // Render loading screen
        return BrOk;
    }
};
Main Menu Stage
Create a Stage asset in the editor with these layer types:
Stage: "MainMenu"
├── WorldLayer: "Background"
│   └── Scene with 3D menu background (entities, camera, lights)
├── AudioLayer: "Music"
│   └── Menu background music and sound effects
└── SparkLayer: "UI"
    └── Menu buttons, text, and UI elements
Optionally attach a script class to the Stage (not as a layer) for handling button events and menu logic.
Gameplay Level Stage
Create a Stage asset with these layer types:
Stage: "Level1"
├── WorldLayer: "World"
│   └── Scene containing all 3D content:
│       ├── Environment entities (lighting, sky, fog)
│       ├── Terrain entities
│       ├── Gameplay entities (player, enemies, pickups)
│       └── Camera
├── AudioLayer: "Audio"
│   └── Background music, ambient sounds, 3D positioned sounds
├── SparkLayer: "HUD"
│   └── Health bars, score, minimap, UI overlays
└── DebugLayer: "Debug" (optional, development only)
    └── Physics debug visualization, AI debug info
Important: There is no “Environment layer” or “Terrain layer” - all 3D content lives in Scenes loaded by WorldLayer. The Scene contains entities with different purposes, but they’re all managed by the same WorldLayer. You organize your scene content using entity names, groups, and scripts, not by creating multiple layers.
Debugging
Logging
log::info << "State entered: " << getName() << Endl;
log::warning << "Frame rate drop: " << info.getFrameDeltaTime() << Endl;
Profiling
Traktor has an integrated Profiler that automatically measures performance when running from the editor:
How It Works:
- The runtime automatically profiles all major systems (update, physics, render, build, GC, etc.) using
T_PROFILER_SCOPEmacros throughout the engine code - When connected to the editor via Target Manager, profiling data is sent in real-time
- The editor displays performance metrics in the Profiler Dialog (accessible from the Target Manager)
What Gets Profiled Automatically:
- Update time - State update, input processing (per simulation step)
- Physics time - Physics simulation (per simulation step)
- Build time - Render graph construction
- Render CPU time - CPU-side rendering work
- Render GPU time - GPU execution time (via GPU queries)
- GC time - Script garbage collection
- Frame rate - FPS and frame timing
- Memory usage - Allocated memory, heap object count, script memory
Viewing Profiling Data:
- Run your game from the editor using the Target Manager (click Play)
- The Target Manager shows live performance statistics
- Open the Profiler Dialog to see detailed timing breakdown with flame graphs
Adding Custom Profiling Scopes:
You can add profiling to your own code:
void MyCustomFunction()
{
    T_PROFILER_SCOPE(L"MyCustomFunction");
    // Your code here - will be measured and shown in profiler
}

// Or manual begin/end
T_PROFILER_BEGIN(L"Complex Operation");
// ... code ...
T_PROFILER_END();
Note: Profiling is enabled by default on desktop platforms and disabled on mobile (Android/iOS) for performance. See T_PROFILER_ENABLE in Core/Timer/Profiler.h.
See Also
- Architecture Overview - Engine design
- World System - Entity and component system
- Scripting - Lua integration
- Resources - Asset management
References
- Source:
code/Runtime/IApplication.h - Source:
code/Runtime/IState.h - Source:
code/Runtime/IStateManager.h - Source:
code/Runtime/Engine/StageState.h- State implementation that wraps Stage - Source:
code/Runtime/Engine/Stage.h- High-level stage container - Source:
code/Runtime/Engine/StageData.h- Editor representation of stages - Source:
code/Runtime/Engine/Layer.h- Base class for all layers - Source:
code/Runtime/UpdateInfo.h- Update timing information - Source:
code/Runtime/IRuntimePlugin.h- Plugin system - Source:
code/Runtime/Impl/Application.cpp- Main application loop implementation