Tutorial 00: Create Your First Project
Once you have the Traktor editor running, it’s time to create your first game project. This tutorial walks you through creating a workspace and understanding the project structure.
Creating a New Workspace
A “workspace” in Traktor is your game project. It contains all your assets, scenes, scripts, and settings.
- Launch the Traktor editor - Run
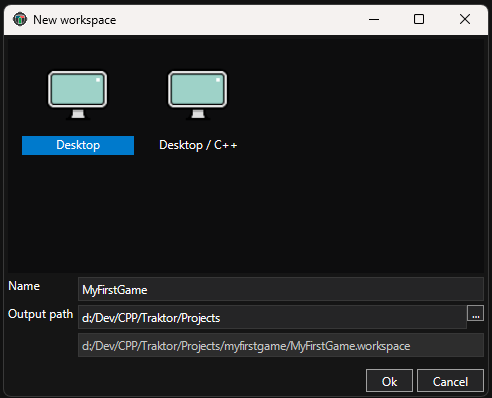
Traktor.Editor.App.exe(Windows) orTraktor.Editor.App(Linux) - Create a new workspace - Go to File → New Workspace
- Choose a template - Select Desktop (not Desktop/C++) for a PC/Linux game project
- Name your project - Enter a name like “MyFirstGame”
- Select a location - Choose where to save the project on your filesystem
- Click OK - The editor creates the project structure and opens it
Note: You’ll see two template options: Desktop and Desktop/C++. For this tutorial, choose Desktop. The Desktop/C++ template is a more advanced option that includes C++ project files for native code development - we’ll cover that in later tutorials.
Understanding the Project Structure
After creation, your project directory looks like this:
MyFirstGame/
├── MyFirstGame.workspace     # Workspace configuration file
├── data/
│   ├── Source/               # Your editable assets (scenes, scripts, textures)
│   ├── Output/               # Built/cooked assets (generated by pipeline)
│   └── Temp/                 # Temporary build files (safe to delete)
└── info/                     # Additional project metadata
The Source Directory
Source is where you work. All your scenes, materials, scripts, and textures go here. This is what you edit and version control.
This is the most important directory - it contains all your creative work in editable form. Think of it as your workshop where you build and modify everything.
The Output Directory
Output contains the optimized runtime assets. The pipeline generates these automatically when you save changes. Don’t edit these files manually.
The pipeline transforms your Source assets into optimized formats that the game engine can load quickly. This happens automatically in the background as you work.
The Temp Directory
Temp stores intermediate build files. You can safely delete this directory; it will be regenerated when needed.
If you run into strange build issues, deleting the Temp directory often resolves them by forcing a clean rebuild.
Understanding Asset Files
The editor uses special file extensions for asset management:
.xdi files (Database Instance) - Your actual asset data. The scene layout, the material properties, the script code. This is the “real” asset.
.xdm files (Database Metadata) - Store information about the asset: its type, its unique ID, its dependencies. The editor uses this to track relationships and build the dependency graph.
.xil files (Instance Link) - References to other assets. Instead of duplicating an asset, you create a link that points to the original. Change the original, and all links reflect that change.
.xgl files (Group Link) - References to entire folders/groups. Useful for organizing large projects with shared asset libraries.
You don’t typically need to interact with these files directly - the editor manages them for you. But understanding what they are helps when working with version control systems like Git.
Next Steps
Now that you have a project created and understand its structure, you’re ready to create your first scene.
Continue to Tutorial 01: Create Your First Scene to add lighting and geometry.
See Also
- Editor Documentation - Complete editor reference
- Database - Understanding asset management
- Pipeline - How assets are built